

INTRODUCTION
In this installation of our teardown series, I will be examining a very common electronic item that all of us use but may not think about too much - the computer mouse!
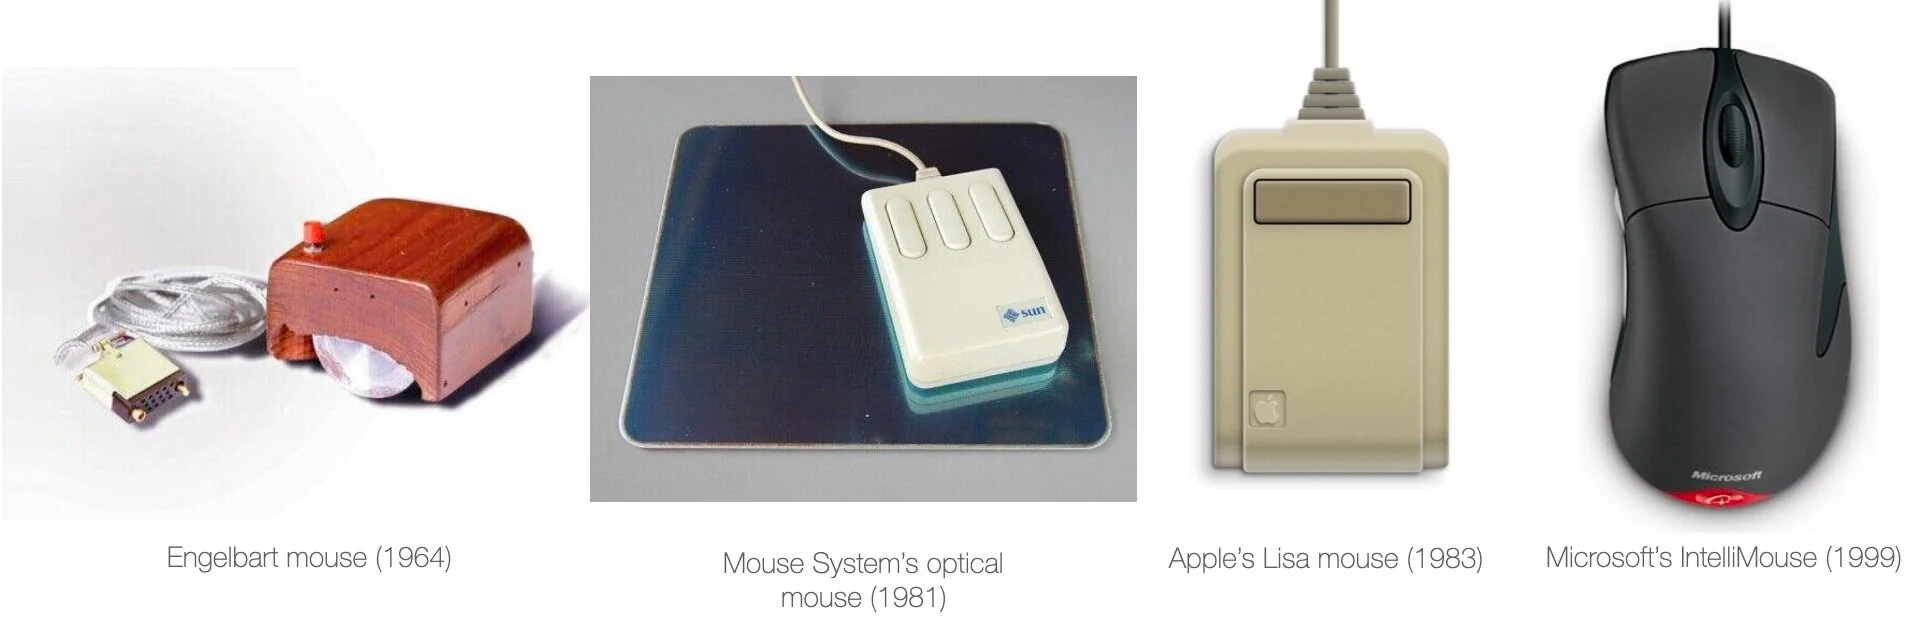
The mouse is something we move with our hands in 2D space (a table) to make selections with a pointer on the screen. The first computer mouse was invented by Douglas Engelbart in 1964. It was designed in a wooden box, with two perpendicular metal wheels that make contact with the surface and only one button. It was first publicly demonstrated by Engelbart in 1968, along with other extremely important breakthroughs that have since shaped our digital world today, such as the early version of the internet, word processing, online collaboration and video calling. This demo by the Stanford Research Institute is now called the “Mother of All Demos”. The ball mouse followed up soon after, which had a rubber ball which moved in all directions and picked up the user’s positional change. Apple, in collaboration with IDEO is credited for developing the first affordable mass-produced mouse for their Lisa computer system in 1983. IDEO brought the mouse price down from $400 to $25 using simpler optical encoder systems and integrating it into injection moulded parts suitable for mass manufacturing. Next came the optical mouse, which was invented by Steven Kirsch in 1981. The first version needed its own expensive trackpad. A version that did not need a trackpad was released by Microsoft, the IntelliMouse 3.0, in 1999 and variations of that are still in use today! Today’s mice also include RF or Bluetooth technology to eliminate wired connections.
You may be wondering how your optical mouse works. You may have noticed the small blue or red LED (or laser) light on the bottom of your mouse. This light reflects off the table surface and back to a complementary metal-oxide semiconductor (CMOS) sensor, which converts light into electrical signals so that the light’s position can be tracked. This is the same sensor used in cameras to detect light and take pictures. Your mouse is actually taking hundreds to thousands of low res pictures per second too. The CMOS sensor sends each image to a digital signal processor (DSP) for analysis. The DSP, operating at 18 MIPS (million instructions per second), is able to detect patterns in the images and see how those patterns have moved since the previous image. Based on the change in patterns over a sequence of images, the DSP determines how far the mouse has moved and sends the corresponding coordinates to the computer. The computer moves the cursor on the screen based on the coordinates received from the mouse. Since this happens hundreds of times each second, the cursor appears to move very smoothly. [1] Since the camera detects motion based on the change in position of small irregularities on the surface, the mouse does not work well on especially smooth surfaces. Even glass may throw an optical mouse off since the light will refract.
If you are not a gamer, you may not be familiar with all the specs used to describe the performance of the mouse. There are a few key parameters that can dictate the mouse’s performance.
Counts per inch (CPI): This measures the pixels your mouse moves for every inch of physical travel of the mouse. This number can range from 400 to 16,000!
Polling rate: The frequency at which the mouse sends data to the computer. This can range from 60 Hz to 1000 Hz.
Frames per second (FPS): The number of frames the optical sensor captures in one second. This can range from 400 upto 4000 fps.
TEARDOWN
Now to the teardown! I have been using the Microsoft Designer Bluetooth Mouse for about 3 years now and although modern optical mice do not have the issue of dust clogging the ball, there are still exposed components like the scroll wheel and buttons that can allow lint to get inside and make the buttons feel sticky. However, this issue is easy to fix as all you have to do is open the mouse up and clean away the dirt. This is what inspired me to make the teardown as it may help others in opening their mouse. if you are using another mouse, please try searching for your model on YouTube or iFixit to see if someone else has uploaded a teardown procedure. If not, you can give it a try yourself and make sure to record and upload it so that it may help others. In this article, I examine the industrial, mechanical, and electronic design that went into making the mouse.

Industrial design
The main requirements of the industrial design of the mouse are that it should be ergonomic, intuitive to use, and aesthetically pleasing. Given the abundance of variety in mouse designs available to consumers today, it is clear that different users have different ergonomic and aesthetic preferences. There are different ergonomic types that fit individual requirements. Even within ergonomic designs, there is a range of style, from minimalistic with little to no buttons to “maximalistic” gamer mice, some complete with a full number pad to customise hotkeys and RGB lights to stand out. On this spectrum, the Designer Mouse sits very close to the minimal end.

The wide variety of designs also display different uses of curvature continuity (C0, C1, C2..) by their designers to invoke different emotions. For those unfamiliar with the concept, please check these links [2] and [3]. For example, on the minimal side of the spectrum, the Apple Magic Mouse uses almost exclusively C2 or higher curvature (which Apple is famous for) to invoke emotions of elegance and simplicity. On the other hand, the gaming mouse on the right predominantly uses C0 edges to communicate its precision and grandiose. The Designer Mouse, uses a hybrid C2~0 to perhaps signify both form and function.

As mechanical engineers, we tend to stick to exclusively using fillets, which are C1 curves, in our designs. The reasons for this are likely a lack of knowledge in the theory of surface continuity, unavailability of the right tools in CAD packages, and limitations in manufacturing techniques. This often leads to “boring” or uninspired designs in everyday objects but once you start noticing the curvature on your products, you will notice the visual appeal that good use of curves make. Apple products are most famous for their product’s industrial design; their products never use C1 curves (fillets). So next time you are designing something consumer facing, try to deliberately think about the placement of sharp edges, tangents, and curvature to give your product more character and appeal. In fact, the industrial design of this mouse seems to be a hit with consumers, as Microsoft reused the design in the Surface Mobile Mouse and the Modern Mobile Mouse. As a bonus, I found a tutorial on how to design this mouse on the Autodesk 3DS Max using polygonal modelling if you would like to see how the mouse can be modelled.
Mechanical Design
Let’s look at the mechanical design of the mouse outside-in, starting with the enclosure. The top shell is a thin injection moulded part, made of ABS but has a soft TPE second shot layer on the outside to provide a more comfortable texture for the user. This soft material coats every outer surface of the mouse, to provide a consistent texture. The top shell also has a split on the upper half that allows the two divided sides to flex slightly, allowing the sides to act as the left and right buttons. This clever mechanism is used in many mouse designs and it removes the need for extra button parts. The top shell is not screwed down and instead uses snap fit tabs that lock it to the frame below. These tabs must be carefully opened in order to remove the shell off.
Removing this top shell, we see the frame. This ABS component provides stiffness to the top half of the mouse assembly, since the top shell has to be quite thin in order to flex the right amount as well as allow power indicator light to pass through it. The frame also houses a light pipe that diffuses the power indicator LED light. It is screwed down into the bottom frame using self-threading screws.
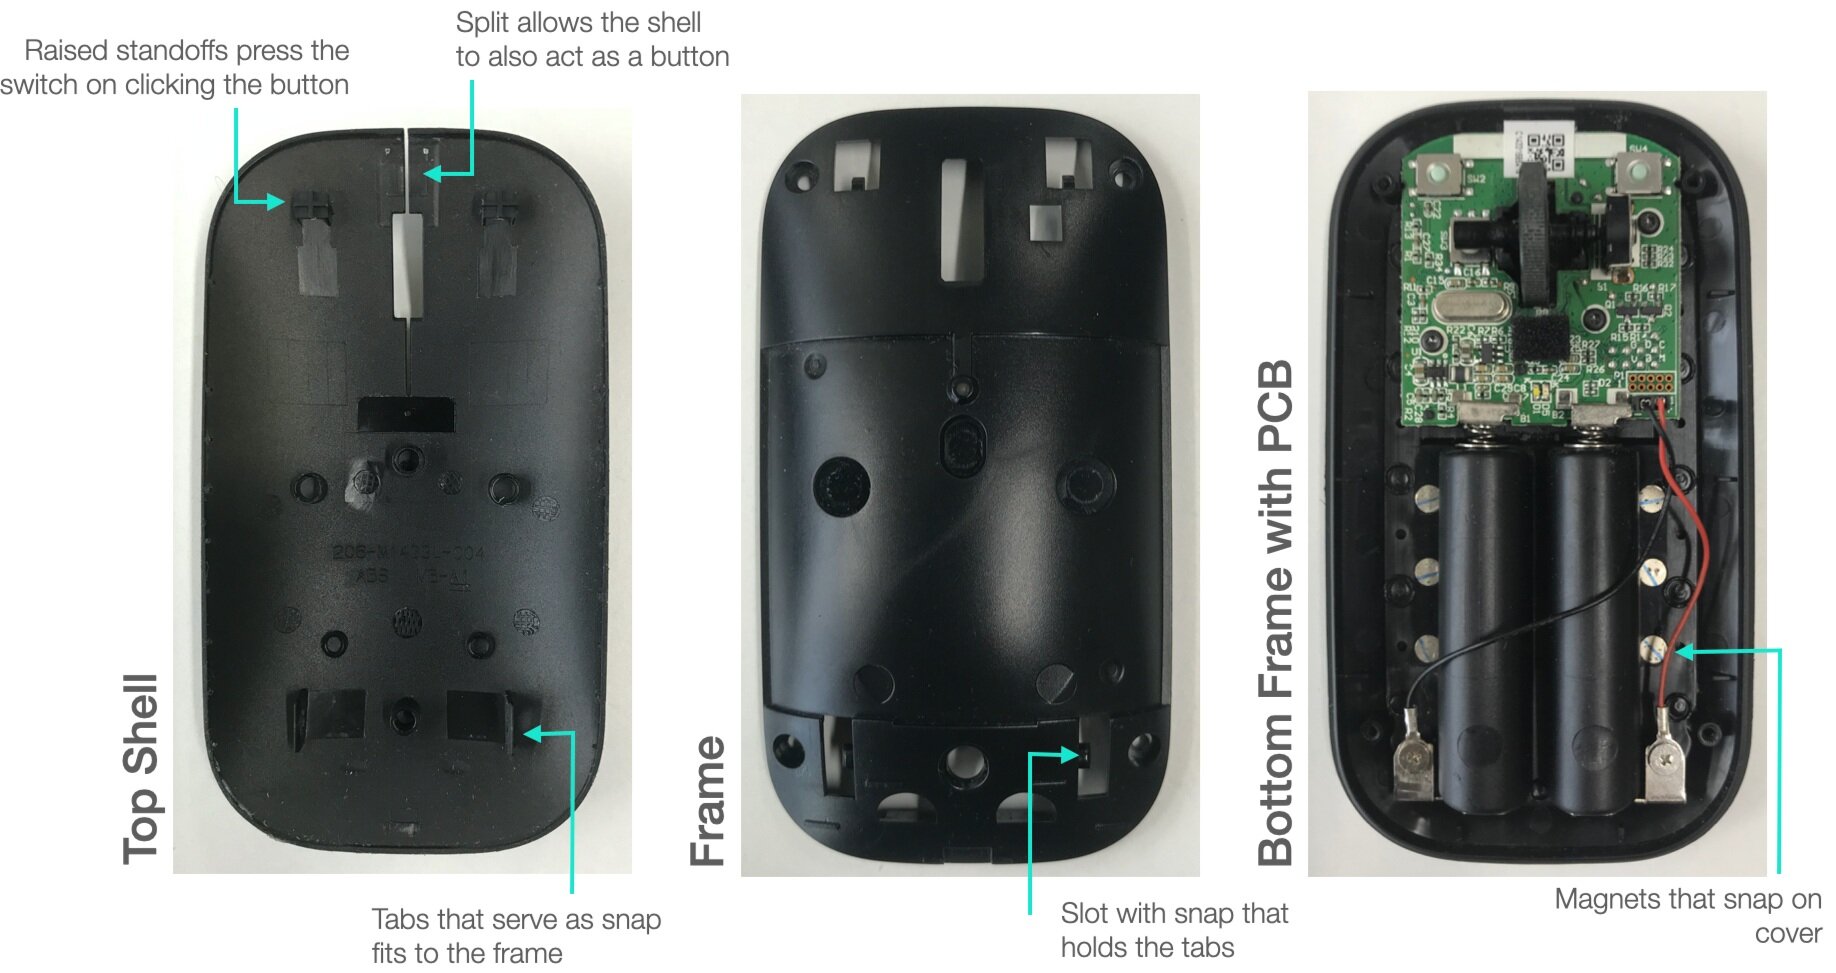
The bottom frame houses the PCB, the batteries, and a small power/BT sync button on the bottom side. The battery housing features a magnetic cover which only snaps into place when placed in the the correct orientation. This is done with the use of a magnetic film inside the cover and small neodymium magnets on the inside of the frame. The battery negative contacts are different from the usual helical spring contacts. They have used deep drawn caps with a spring on the inside, as shown below. In Apple-like fashion, Microsoft has also ‘hidden’ the regulatory information in the battery compartment. This small detail is not noticed when done right but can be an eye-sore when visible.

Electrical Design
There are essentially three main functions that the PCB does:
Measure and process the movement of the mouse in 2D space
Take button and encoder wheel inputs
Send this information to the computer

Credit: Avago Technologies
As described earlier, an optical mouse measures position by taking multiple low-res pictures of the surface and comparing the relative motion between them over a given time period to calculate the distance moved and the speed of the movement. An LED illuminates the surface in order to improve picture quality. This data is processed by the microcontroller and the X-Y position change is sent via the transmitter. The optical sensor aims to balance performance, in the form of FPS and Polling rate, with battery life. This is why many gaming mice use a wired connection, to avoid transmission lag as well as a low battery life.
The right click and left click buttons are standard tactile switches and the scroll wheel is attached to a mechanical or optical encoder. Many times the scroll wheel also acts as a third button. In this case, there is a third tactile switch under the scroll wheel.
Finally, all this information is transmitted to the computer via an RF dongle or Bluetooth connection. There are pros and cons for both solutions. A dongle connection requires a dongle, obviously, to be plugged into your computer, which can be unsightly, lost, or damaging to your USB port. However, since it can be optimised for your mouse, it may perform better than a Bluetooth connection. It is also inexpensive to implement, which is why it is more common with lost-cost mice.
BILL OF MATERIALS
The Designer Mouse retails for $30 (₹2250) in the US. The final retail price of a hardware product is often a function of the bill of materials (BOM), which is the cost of all the individual components that make up the mouse. I have listed out and estimated the cost of every part of the mouse in the table below, if it were to be made in India. The plastic injection moulded parts include the material price as well as the amortised cost of the tool with an assumed mass production quantity of 10k units. The BlueTrack sensor is a proprietary sensor developed at Microsoft and is used exclusively by them so I have instead used the price of a similar generic optical sensor.

My estimate of the BOM is ₹332 ($4.44). This assumes all the items are purchased in bulk, reducing the unit cost significantly. However, one cannot simply subtract the BOM from the retail price to get the profit margin. There are many components added to the BOM that are generally a percent of that BOM. There are additional costs such as assembly labour, shipping, and third party logistics. These components are described in more detail by Chrissy Meyer on her Medium article “The Hidden Cost of Hardware”. The table below summarises these costs for a fictional item whose BOM is about $100.

Credit: The Hidden Cost of Hardware
Based on these percentages, the OCOGS of the mouse comes to ₹531 ($7.10). This makes some sense, as the retail price for the cheapest bluetooth optical mice available online is of ₹1500, which yields a profit margin of 64%. In comparison, Microsoft’s profit margin for this mouse would be about 76%, which is something they can command for their brand value and expectation of quality. The profit also offsets the cost of R&D work Microsoft puts into their mouse design (for example, this appears to be the patent for the BlueTrack technology used on this mouse).
SUMMARY
The computer mouse has been around for more than 60 years, which is ancient in computer terms. Yet, it is not just still ubiquitous today but also the preferred choice of tool over even the latest alternatives such as the touchpad or touchscreen. Although there are different ergonomic options available, the horizontal style is still the default choice of many and is a testament to the longevity that a well designed product has.
Where do you see the evolution of the computer mouse going? What improvements can be made to the mouse design to improve its design or performance? Will other technologies like VR/AR make the mouse redundant? Comment your thoughts below.

Thank you for going through T Work’s teardown. The purpose of these teardowns is to help promote a culture of making by lowering the knowledge barrier required to design and create your own ideas and inventions. By studying existing solutions, the designer can draw inspiration for their own design, and also avoid ‘reinventing the wheel’, which can help save significant design time and resources. We want this series to be a collaborative effort between T Works and our community and so we would love to hear from you! What are some products you would like to see taken apart? What sections can we add to our teardowns that would add more value to the maker community? Send us your comments, questions, and suggestions to teardown@tworks.in!